This should be easy to follow for anyone, even if you've never even worked with Netbeans. The only thing you might need to take a look at first, is connecting to a database.
Since the JSR-296 (Swing Application Framework) has been deprecated, you might think that it's no longer possible to quickly throw together a CRUD app, but you'd be wrong :-)
If you want to follow along, fire up Netbeans 7.3 and follow along, this will be a mostly visual how-to. I'm running on Ubuntu, but you should get very similar visuals with a Mac or PC.
Start up a new project - as shown, go for Java->Java Application


Okay, so now add a new form, right-click on your project name, you should see something like this. You will see that once you've done this once, the 'Master/Detail Sample Form' should become one of your top selections when you right-click and then select 'New'.


And look at that! We have a form that allows you to select a database connection, table & fields to use. Not bad at all!

I've just selected the local Derby database, but as long as you know the connection details for you database, you could connect to any other database you like. I'm not going to go into details here, there's lots of information on that if you browse the interwebs a bit. In particular, connecting to a MySQL table is just as easy as connecting to this sample Derby database.

You will see that in the first selection, it shows the 'Customer' database, and this is the one that is used in a lot of demos. There is a particular problem with this though, the fields are very straight-forward, so I will be using the 'Purchase_Order' database, since it has a date field.

If you click next, you will be able to select fields to use and move them up & down.

Click 'Next' and you will get a form with the master-detail components you would expect.

I've just click-dragged it to enlarge the form.

In the next step we'll do something you might find a bit odd, but it's the easiest in this case. Just go ahead and delete the 'CRUDDemo' form. If you try to run the project now, you will get this notification, just click 'OK' and it will become the new main class.

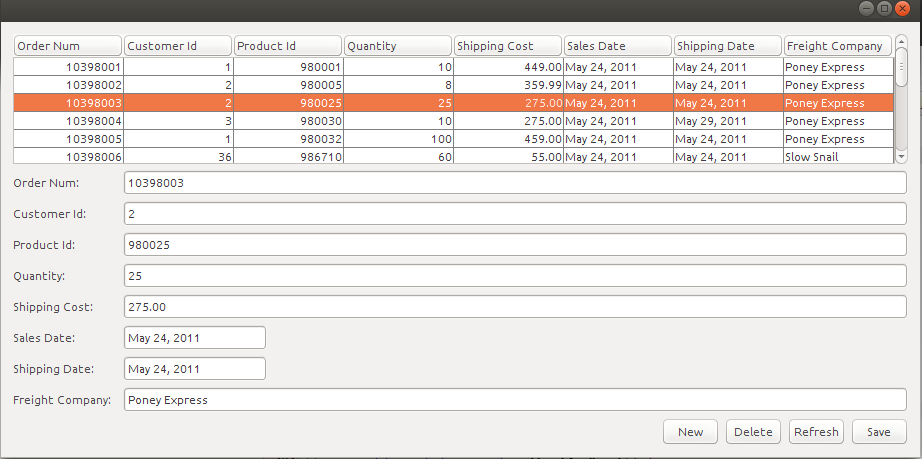
Once you've done that, you should be able to launch the application. Look at that! A fully functional CRUD application in no time & no coding at all.

Go ahead and click on one of the top rows & you should see the detail part filling up. There is one problem though, take a look at the 'Sales Date' and 'Shipping Date' fields, they're empty. That's the little secret that the other more simplistic demos do not show you how to resolve.

If you take a look at the output window at the bottom, you will see the error that's being thrown - 'Cannot cast java.util.Date to java.lang.String'.


Find the 'FormattedField' component and drop them next to the date fields.

It should look something like this now.

Take note of the variable name by right-clicking on the original 'Sales Date' item and clicking on 'Change Variable Name'. We're not going to change the name, but you can copy the name to use it in the next step.

Right-click on the 'Formatted Field' and select 'Bind->Value', then pick the 'Binding Source' and 'Binding Expression' as below. Once you've done that, you can delete the original 'Sales Date' field.

Now rename the new Formatted Field to 'salesDateField'.

Do the same for the other date field & hook it up to the 'Shipping Date'. Once you've done that, you should no longer get the error and the date fields should show properly.

You might notice that our new fields do not behave quite the same as the original ones. The original fields are disabled, until you select a row. To make the new fields behave in the same way, click on one of the original fields and copy the text as shown below.

Now just click on one of the new fields & just paste it in.


So that's it! You now have a truly fully functional CRUD application with no real coding required. There is one thing that's still bugging me, I don't like the Nimbus look that much. Let's change that, it's pretty easy to do. Locate the piece of code as shown below.

Type in the bit of code as shown below. Take care where you enter the code by looking at the highlighted starting and ending curly brackets.

Add the javax.swing.UIManager.

Add a reference to the setLookAndFeel in the main section.

Launch the application again & now you should have the same look as your OS. In my case that's Ubuntu & now everything works exactly as expected.
There's still some functionality we can add easily, that's to make it possible to sort any of the fields. Look at the three lines below and add them to your NewMasterDetailForm.

Right-click on the top table grid and then check the box that says 'autoCreateRowSorter' - and that's it!


Let's take it one step further, by adding an icon for the application. Type up the line below.

We'll change it in the next step or two though, I've just copied and pasted the line from code that I had already. There's a really easy way to cheat and get the image we want imported into our project. Just drop a label anywhere on an open space, we'll delete it again later, this is just to get things going.

Right-click on the label & click on the ellipsis button of the 'icon' element. Then click on 'Import to Project' and select an image that's about 36x36 pixels.


The last missing piece is a title for the form in Windows, to do that, you just add frame.setTitle("CRUDDemo");
as shown below, and you're done.

Here's the look-and-feel piece of code, be aware that you should still have one last closing curly bracket at the end.
public static void main(String[] args) {
setLookAndFeel();
/* Create and display the form */
EventQueue.invokeLater(new Runnable() {
public void run() {
JFrame frame = new JFrame();
frame.setContentPane(new NewMasterDetailForm());
frame.setDefaultCloseOperation(JFrame.EXIT_ON_CLOSE);
frame.setIconImage(new ImageIcon(getClass().getResource("checkout.png")).getImage());
frame.setTitle("CRUDDemo");
frame.pack();
frame.setVisible(true);
}
});
}
public static void setLookAndFeel() {
try {
UIManager.setLookAndFeel(UIManager.getSystemLookAndFeelClassName());
} catch (Exception e) {
System.out.println("Error setting native LAF: " + e);
}
}
Happy coding!